Saturday, April 30, 2011

Tomato Update

I'm not sure why, but growing tomatoes is probably the highlight of having a vegetable garden. Maybe it's because I am trying to accomplish something that never does that well in the cool Pacific Northwest and so any success is a victory for me. The picture above show some green cherry tomatoes from last year's garden (2010).


Earlier this year on a very warm January Saturday, I was able to weed the section of my raised vegetable garden bed pictured above and cover it up with plastic. The large river rocks came in handy as anchors to keep the plastic from flying away in the wind. I am also planning on planting the peppers in this same bed along with the tomatoes. As most gardeners have learned, black plastic mulch will raise the soil temperature by absorbing the heat. The added bonus is that it also keeps the weeds from growing back in the cleared bed. This plastic was given to me by a neighbor who works for one of the mills here in Grays Harbor county and I have discovered that it is a woven material that actually allows water to pass through it. This is a great advantage and answered my question as to why the puddles that collected on the surface disappeared so quickly!


Last week, after planting the pepper seed, I potted up each of the tomato plants. Since they were started in Jiffy peat pots, all I had to do was place each plant, Jiffy and all, into the new pot and fill it with soil. I always fill the pots with as much soil as possible. This not only allows maximum root expansion but also encourages rooting along the stem of each plant. These root stems create a more vigorous plant which is something every one wants.


Here are the newly potted up tomatoes put back under the grow light.


Here they are 6 days later. Notice how much they have grown! All plants have greened up nicely and if I remove some of the soil that is touching the stems, I can see new stem roots appearing! I am planning on keeping them indoors for 2 more weeks and then will begin their acclimatization to outdoor temperatures on May 15. Hopefully, the weather will become more spring-like and I can plant them at the end of the month.


Next post: To be determined!

Sunday, April 24, 2011

Growing Peppers


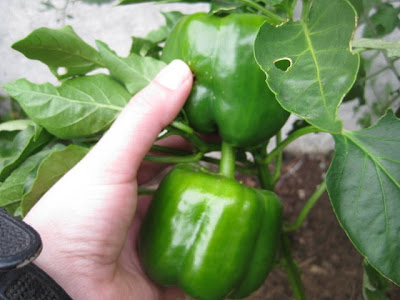
Bell peppers are one of my favorites but I have had very little consistant success with them. The photo above shows a pepper I was able to grow last year (2010) but I did not grow the plant from seed and was actually given the plant from a friend. This year, I am going to try to grow them from seed like I do with everything else. The tricky part is being patient with the seed as it takes twice as long to germinate and needs to be covered by a quarter inch of soil.
I am using Burpee Carnival Mix seed as, like with the carrots, I love unusual colored vegetables and this mix will yield red, yellow, purple, white and orange peppers. Rather than using the Jiffy pots as I did with my tomatoes, I am planting five seed into three four inch pots of soil mix. I would use Jiffys but I am currently all out. After planting the seed, I carefully watered the pots and placed a plastic sandwich bag over the top of each pot to hold in the moisture and create a mini greenhouse. Now, I just need to be patient and not bother them too much.

Like tomatoes, peppers need heat to grow, flower, and set fruit. I have never grown hot peppers but I have read that they require long hot summers to make their fruits produce the heat that they are known for. I like hot peppers but would rather try to master the mild and sweet bell peppers before I go in that direction. I would also need to purchase the equipment neccessary to make cold Western Washington summers similar to hot Mexican summers.


Next post: Tomato update.


Saturday, April 23, 2011

Planting Carrots by Seed

Last year, I decided to try the Ed Hume's rainbow carrot blend in the garden for the first time. It was also the first time that I had ever grown anything in the newly renevated garden. I live in a rental house that came with a raised bed that was filled with a strange assortment of shrubs and pea gravel. On deciding that I wanted to turn it into a vegetable garden, everything had to be dug up. Upon digging, I discovered that the bed was filled with rocks as well as lots of burned and buried garbage. None the less, I decided to try and see what I could grow. The carrots did grow, but as you can see, they are short and fat and some of them split. This is due to the large amount of rocks found in the soil.


This year, I am trying the rainbow carrots again but took the time to actually dig up as many rocks from the soil as possible. The cause of the large amount of rocks is due to the location of the house. Elma is situated near the Chehalis river and my house is quite close to it. Every where you go that is relatively undisturbed, you will find large river rocks. I dug up a row and then hand picked as many rocks as I could and then put them in a pile. I did this at least for an hour until I felt that I had a higher ratio of soil to rocks. I then broke up the soil clods and planted the seed in a single row, spinkled a fine amount of soil over the top of the seed and then watered with my watering can. The seed will germinate in 7-10 days and will hopefully remain undisturbed by the neighbor cats. Despite the carrots being less than perfect looking, they were delicious to eat. Each color has a different taste: purple is very earthy tasting, orange is no different than any other orange carrot, yellow is sweet and has less of a carrot taste, and white is extremely sweet and doesn't even taste like a carrot! The white ones are most likely the least beneficial as far as beta carotene content, but I think eating white carrots is better than eating no carrots at all!


The best soil to grow carrots is rock-free and sandy. This is why carrots are grown commercially in California and other locations where carrot taproots can grow through the soil with out running into anything that would cause them to grow fat or form two or more splits through the root.


For more information, check out my article:


How to grow carrots


Next post: Growing bell peppers


Wednesday, April 20, 2011

Tomato Time!


Every year, I try my best to grow tomato plants 100% on my own. That means that I always start them from seed rather than buy plants. The advantage to growing them from seed is that I get to see them from start to finish and I get a little bit better at growing them every time I do it. The dissadvantage to doing it this way is that I am putting all of my hopes into plants that may or may not make it once I plant them in the garden. This is true with pre-grown plants but if they die, you can always go back and buy new ones and have only invested the money you used to purchase the plants rather than the money and time and effort of getting seeds to germinate, growing them under grow lights, potting them up into soil, and then aclimating them to outdoor temperatures.

Last year, I grew and assortment of heirloom tomatoes plus a few odds and ends that I purchased and were given to me. Because of the terribly wet spring and then a very cold summer, I did not see any tomato fruit until late August all the way into October. Some of them managed to ripen but the rest stayed green and then turned brown after I tried to salvage them indoors. I am hoping that 2011 will bring a better tomato season for those of us in Western Washington.

This year, I am growing heirlooms again. Due to lack of financial resources, I am using leftover seed from last year and have been successful at germinating it. The seed was sown into Jiffy Pots on March 13, 2011 and the plants are now 4 weeks old. As you can see in the photo, they are outgrowing the Jiffys and need to be up potted. Some are also turning yellow which is a sign of stress and lack of nutrients such as iron. I have recently given then a very weak dose of Miracle-Gro to green them back up. I am hoping to buy some potting soil this weekend to pot them up as they will begin to decline if I wait too long.


Here are some of my Helium articles on growing tomatoes:
Tips for growing tomato plants from seed
Tips for growing heirloom tomato plants from seed


Next post: Growing carrots


Thursday, April 14, 2011

Welcome!


Welcome to my first post on my very own blog!


At last, I finally did it! It only took seven months for me to finally make this a reality. I have been contemplating doing this since I joined Helium, which is the site that I publish my freelance work. I will share links to those articles in this blog where applicable.


I will be writing mostly about my gardening which includes my trials and tribulations, new ideas, things that don't grow well, observations, retail nursery experiences, and anything else that is related in anyway and could be shared and enjoyed with others.


For those who do not know me that well or would like to hear more about my background, I have been working in the horticulture industry since 1997 when I was in high school. My first horticulture job was at Molbak's Nursery in Woodinville, WA, where I worked in the indoor and garden plant area of the store. While working there, I attended Edmonds Community College for an Associates degree in Horticulture. After a year of community college, I decided that I wanted to pursue a degree with a little more beef to it and transferred to Washington State University to get a Bacherlors of Science in Genetics and Cell Biology with an emphasis on plant genetics. After graduating, I worked at my last retail garden center (I worked at four total) and landed my current position of supervisor of the tissue culture laboratory at Briggs Plant Propagators.


I have always loved plants and gardening and will be writing and sharing about my vegetable garden quite frequently.


Feel free to ask me questions and share tips. I always love to see messages and comments!


Next week: My heirloom tomatoes and planting carrot seed.